
Step-by-step guide
Every screen and option, in the order you will meet them. The pictures are from a phone and use made-up demo data. Pick a part, or read from the top. The shorter How to use it page has quick answers.
Download the user manual (PDF)PDF, about 49 pages and 7 MB, with screenshots. To read offline or share with someone you help.1. Get started
Setting up takes about a minute. There is no account and no password to remember.
Open the app and start
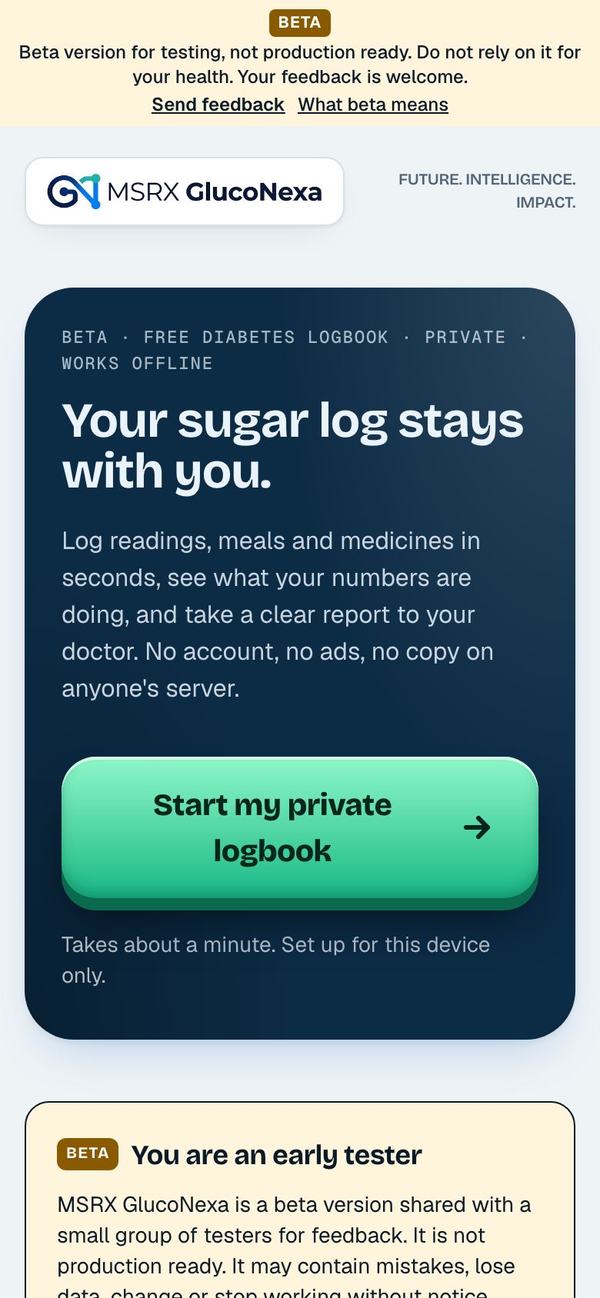
Open the address in your phone's browser. Tap “Start my private logbook”.
On a phone you can also add the app to your Home Screen so it opens like any other app: in Safari choose Share, then Add to Home Screen. In Chrome open the menu and choose Install app or Add to Home screen.
Good to know: A Home Screen copy keeps its own data, separate from the browser. Use one or the other to log, so your readings stay in one place.
Read and accept the user agreement
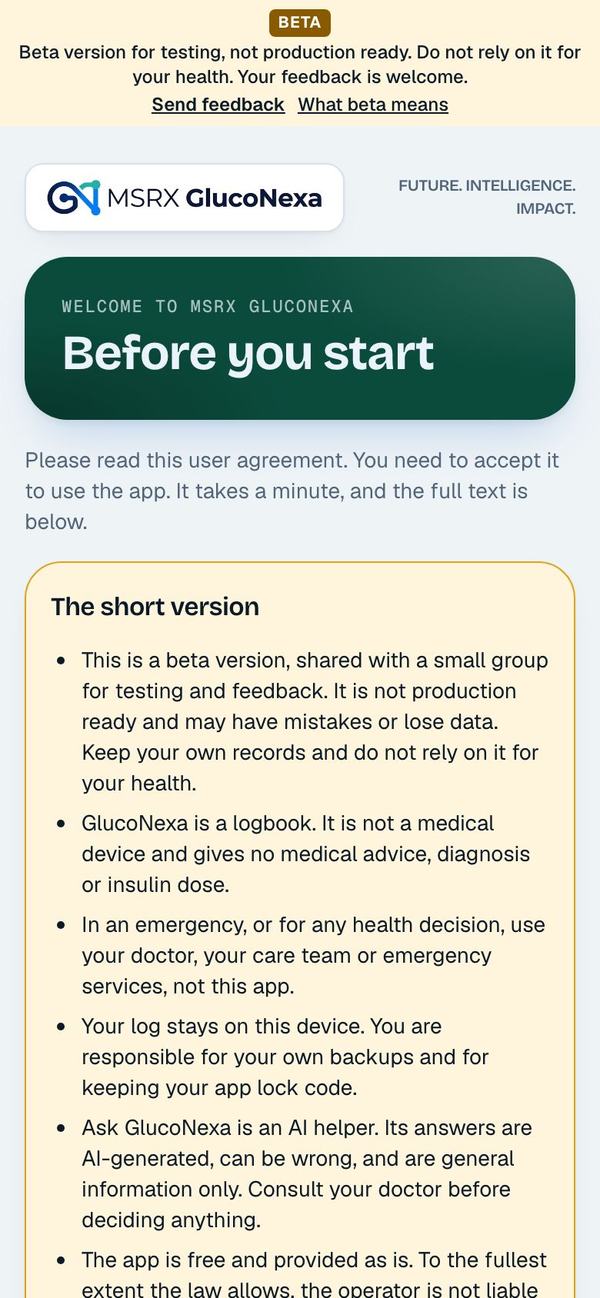
The short version is at the top. Scroll to read the full text, tick the box and tap “I understand and agree”.
The key point: this is a logbook for your own records. It is not a medical device and gives no medical advice, diagnosis or insulin dose.
Tell the app who is using it
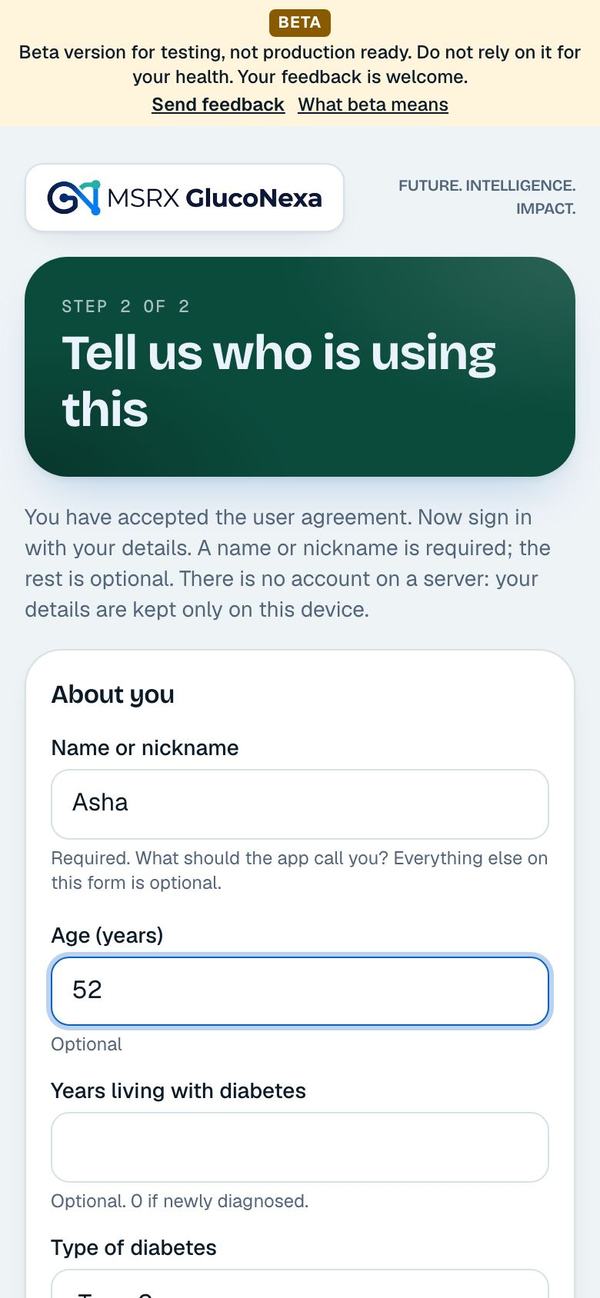
Only a name or nickname is required. Age, type of diabetes, height, weight and the rest are optional. They stay on this device, stored encrypted.
If you add your weight, it is saved as your first weight entry.
Choose whether to lock the app
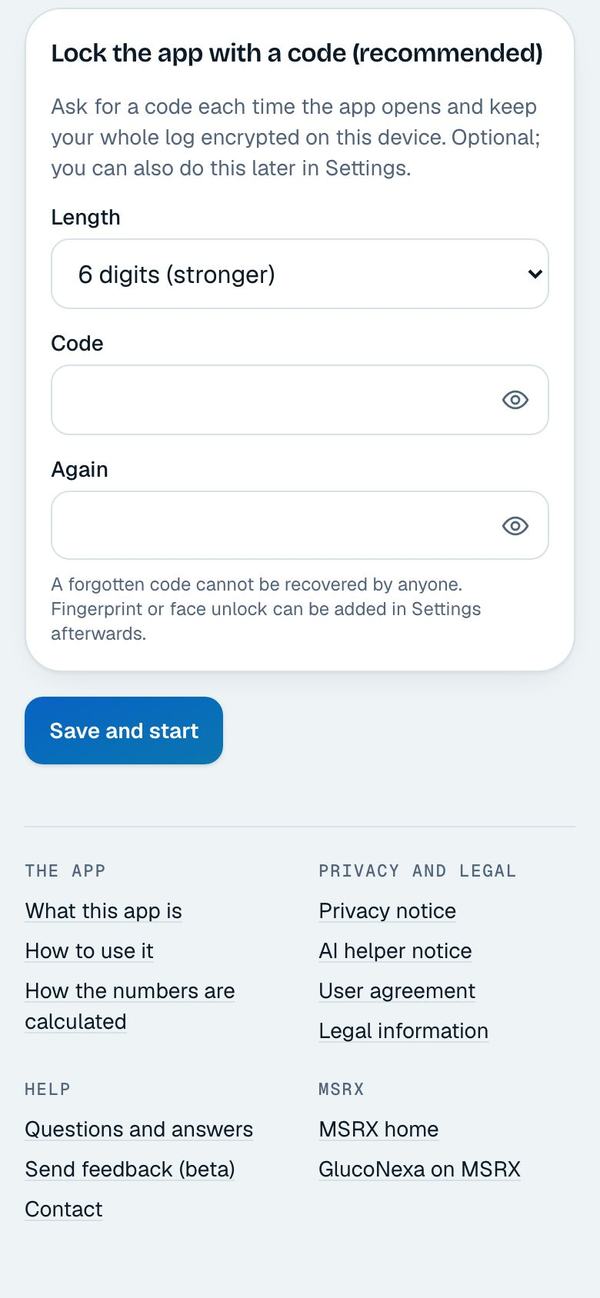
Near the bottom you can set a 4 or 6 digit code that is asked every time the app opens. It also keeps your whole log encrypted on the device. You can skip this and do it later in Settings.
Tap “Save and start”.
Good to know: A forgotten code cannot be recovered by anyone, so keep a backup file somewhere safe (see section 9).
Find your way around
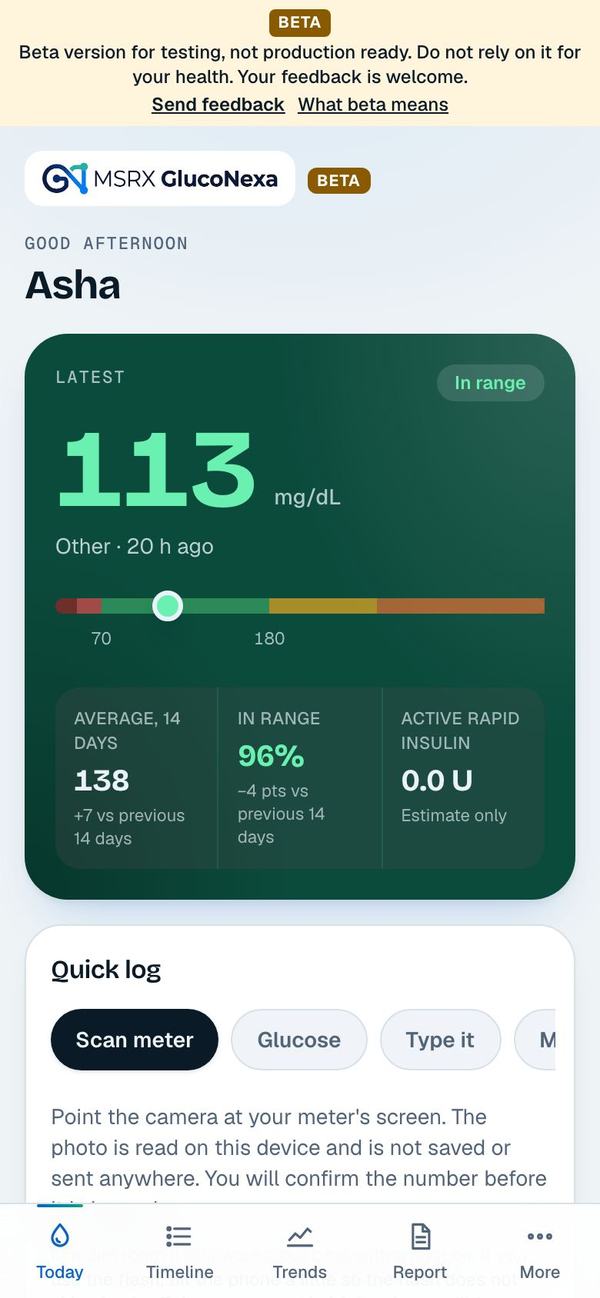
The bar at the bottom of the screen has Today, Timeline, Trends, Report and More. Today is where you log. Everything else is under More.
The blue Ask AI button, bottom right, opens the helper on every screen.
2. Log a sugar reading
On Today, the Quick log card has a row of tabs. Slide the row sideways to see them all.
Scan your meter
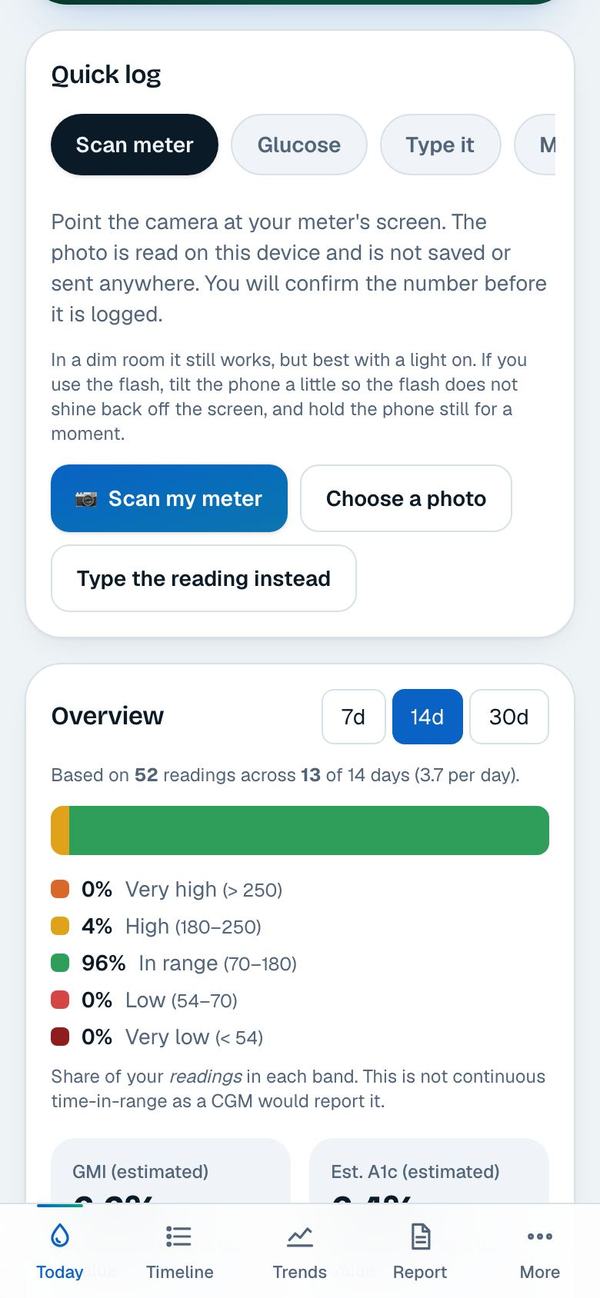
Open the Scan meter tab and tap “Scan my meter”. Photograph the meter's screen in good light and hold the phone still.
The number is read on your phone. The photo is not saved or sent anywhere. The app asks “Your reading is …, correct?” and nothing is saved until you confirm.
No camera? Tap “Choose a photo”, or “Type the reading instead”.
Type a reading with the form
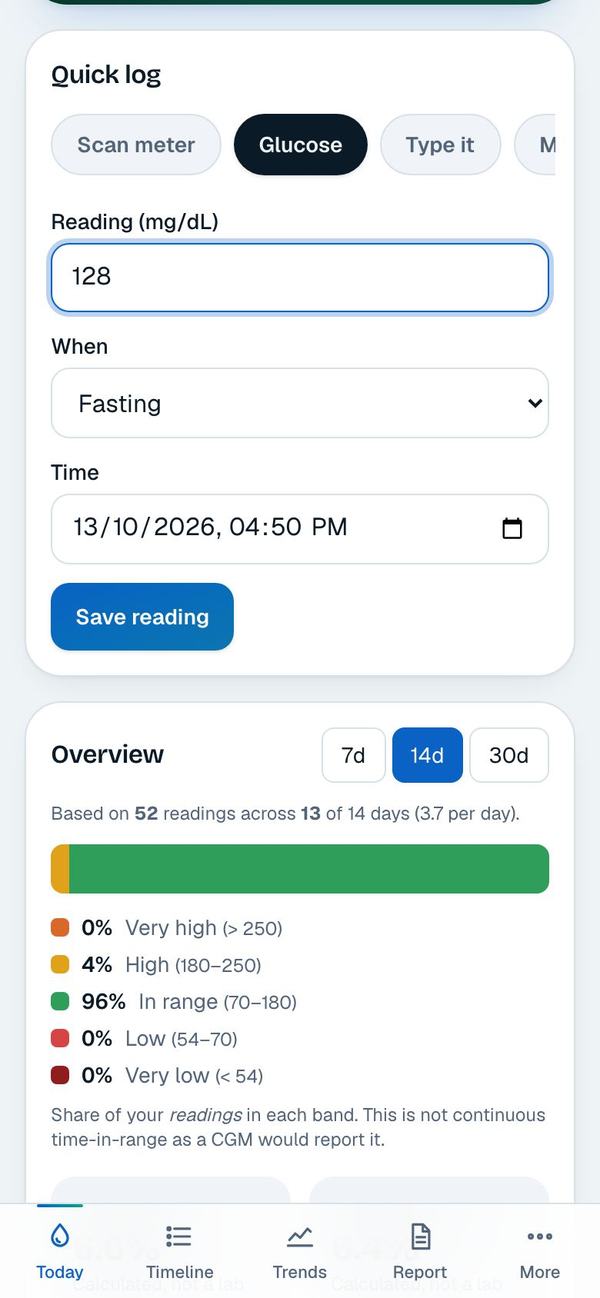
Open the Glucose tab. Enter the reading, choose when it was taken (Fasting, Before meal, After meal, Bedtime, Exercise, Overnight or Other), check the time and tap “Save reading”.
Readings are in the unit you chose in Settings (mg/dL or mmol/L). The app refuses numbers that cannot be a real reading, such as a missing digit or an extra one.
Or just type it the way you say it
Open the Type it tab and write a sentence, for example “breakfast 2 idli sambar, 7.4 after lunch, walk 20 min”. Tap “Read it”.
One sentence can hold a reading, a meal and an activity. Press / on a keyboard to jump to this box, and Ctrl+Enter to read it.
Check what the app understood
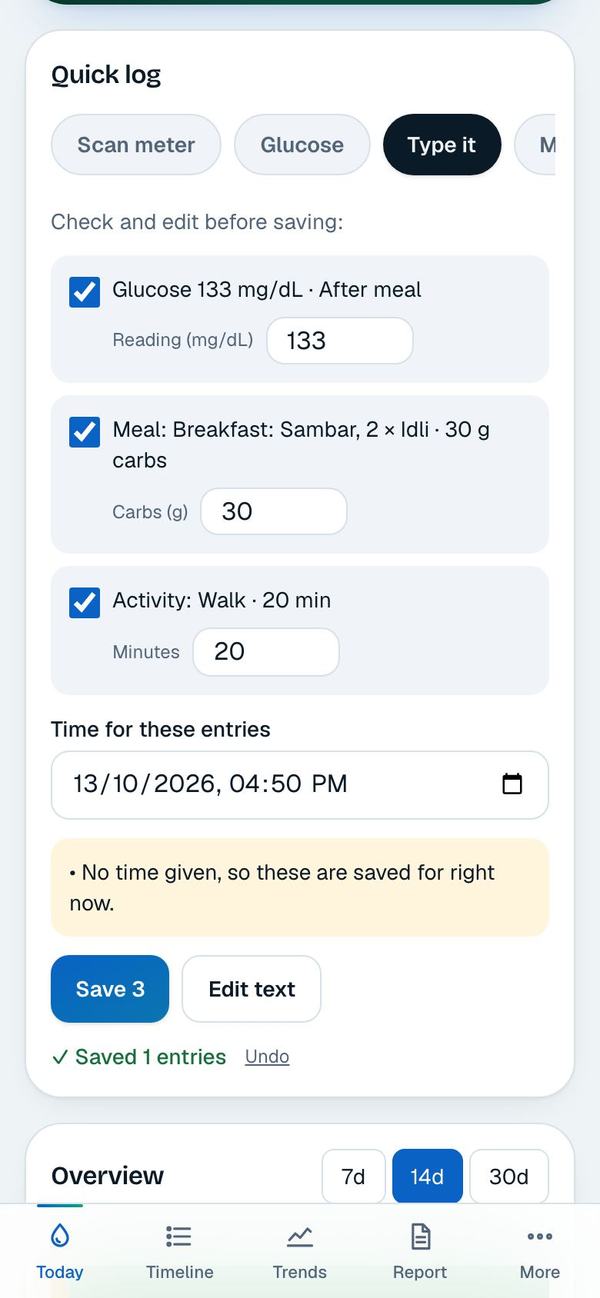
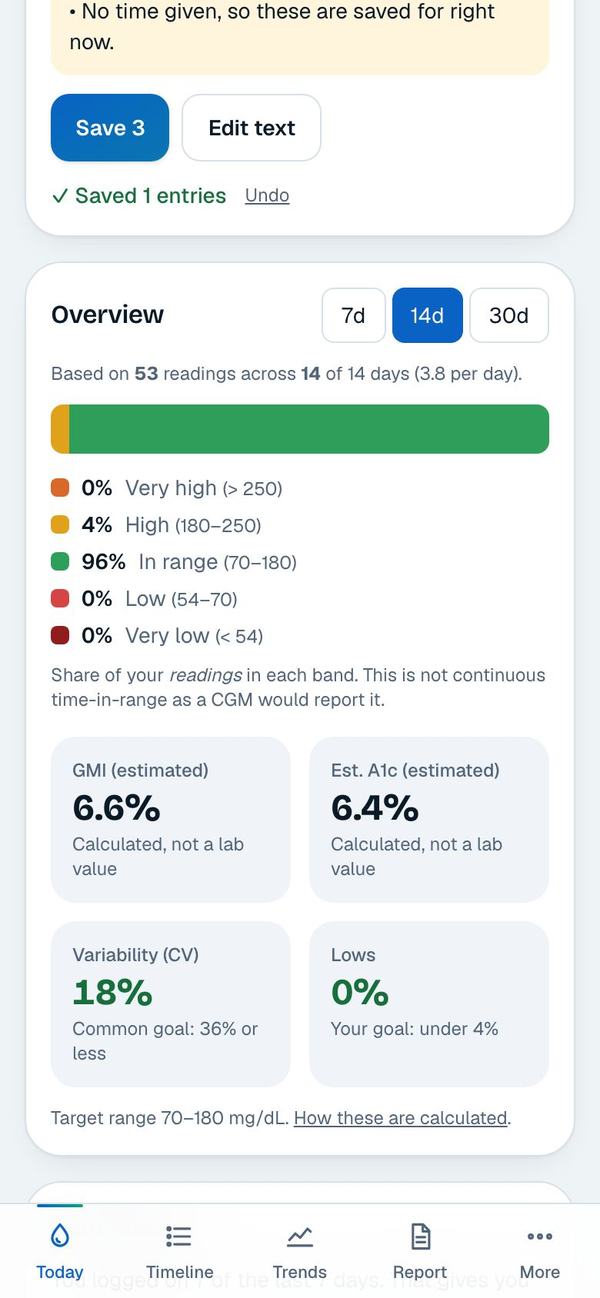
Each item it found appears with a tick box. Untick what is wrong, or change a number straight in the list. Set the time for these entries, then tap Save.
A note tells you if no time was given and it used the present moment. “Edit text” takes you back to your sentence. “Undo” removes what you just saved.
Good to know: Nothing is saved until you confirm. Quick log checks the numbers, but you know what you meant: please read them before you save.
3. Log meals, medicines, blood pressure and more
Same card, other tabs. Every form has a Time box, which starts at now. Change it to log something from earlier.
Meals and carbs
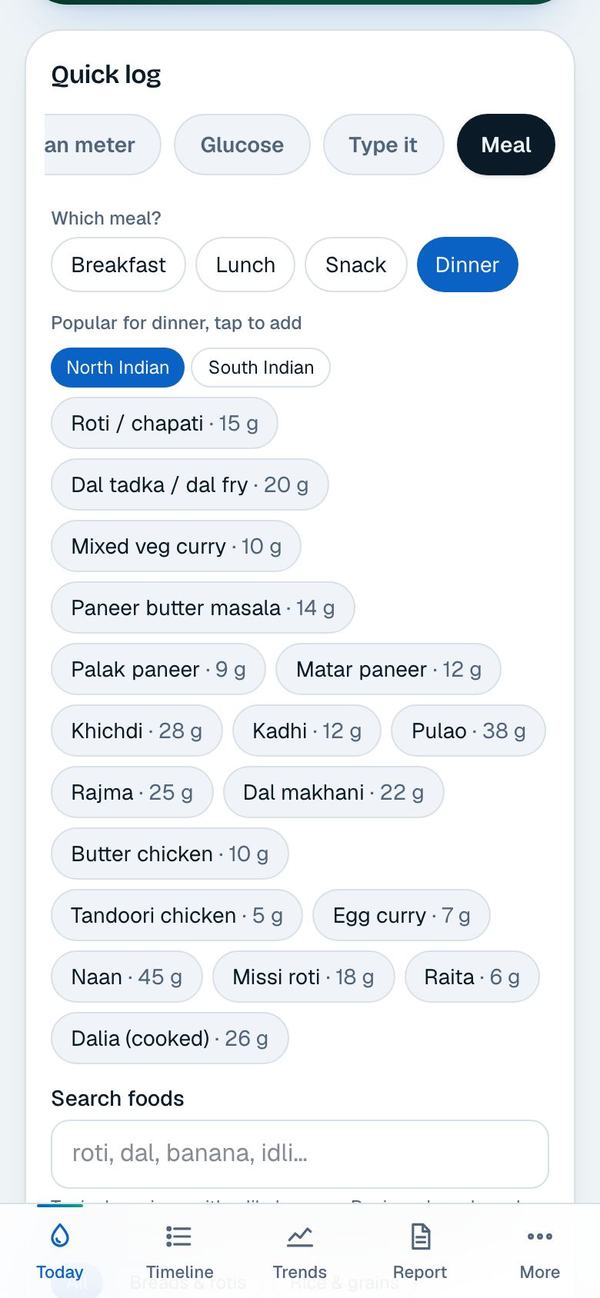
Open the Meal tab and choose Breakfast, Lunch, Snack or Dinner. Tap a food in the popular list to add it, or use Search foods and the categories (breads, rice, dal, snacks, sweets, fruits and more).
Typical servings and carb amounts are shown for each food. A packet label is more accurate than these numbers. “Treating a low” lets you log the extra carbs you took.
Insulin and other medicines
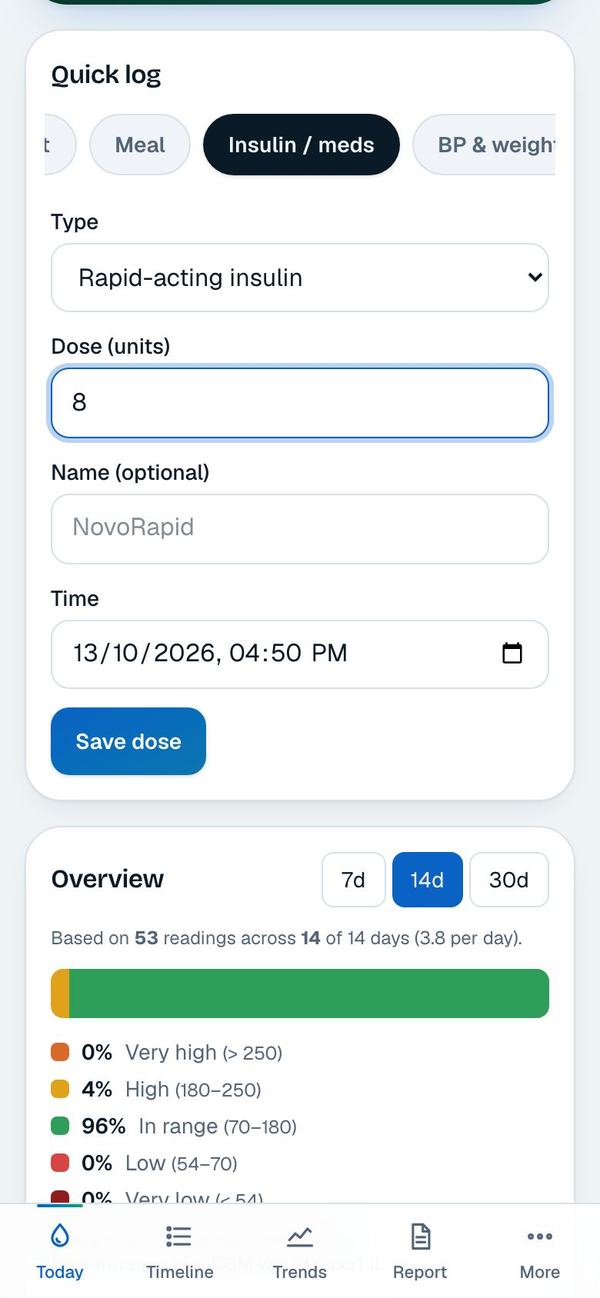
Open the Insulin / meds tab. Choose the type (rapid, long or mixed insulin, or a tablet), enter the dose you took, add a name if you like, and tap “Save dose”.
This only records what you took. The app never suggests, calculates or changes a dose.
Blood pressure and weight
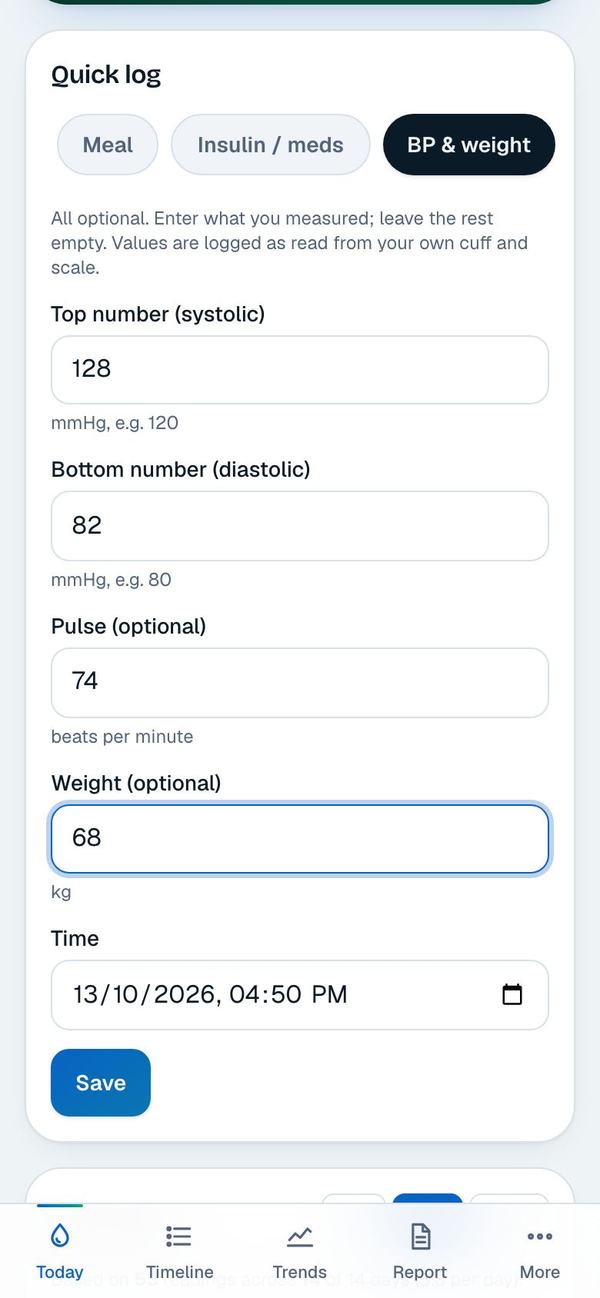
Open the BP & weight tab. Enter the top and bottom numbers, and optionally pulse and weight. Leave out anything you did not measure and tap Save.
Activity, sleep, symptoms and notes
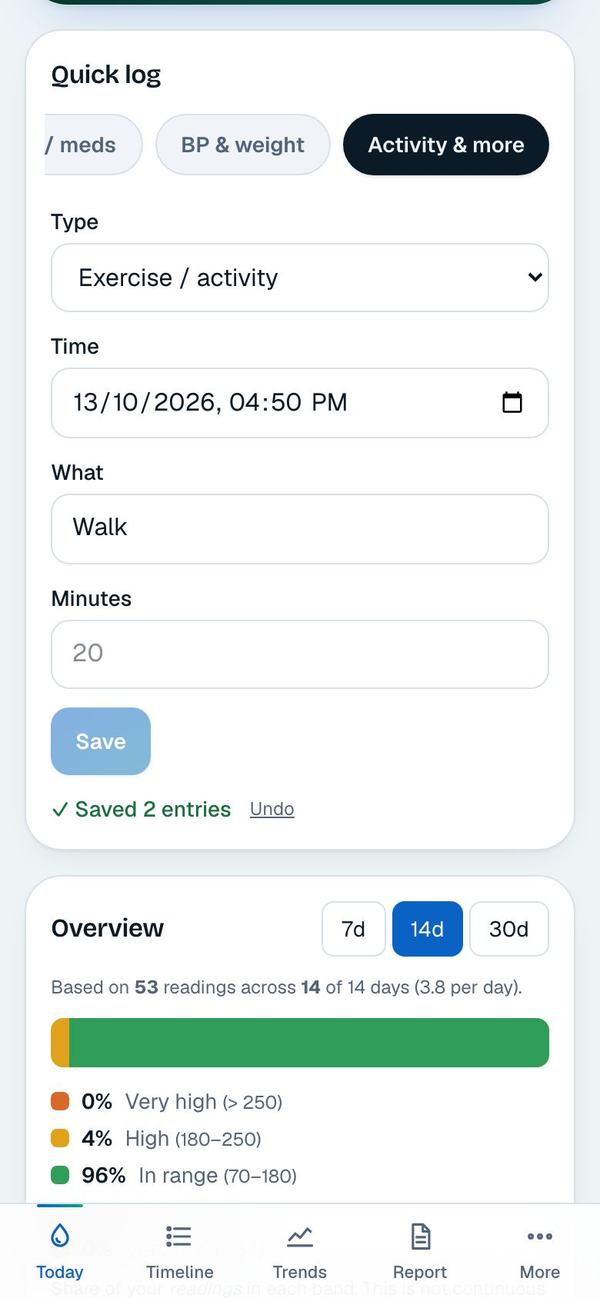
Open the Activity & more tab. Choose Exercise, Sleep, Symptom or Note, fill in the short form and tap Save.
Symptoms and notes show on your timeline and help you and your doctor see what was going on around a reading.
4. Look back, correct and delete
The Timeline shows everything in order, day by day.
Read the timeline
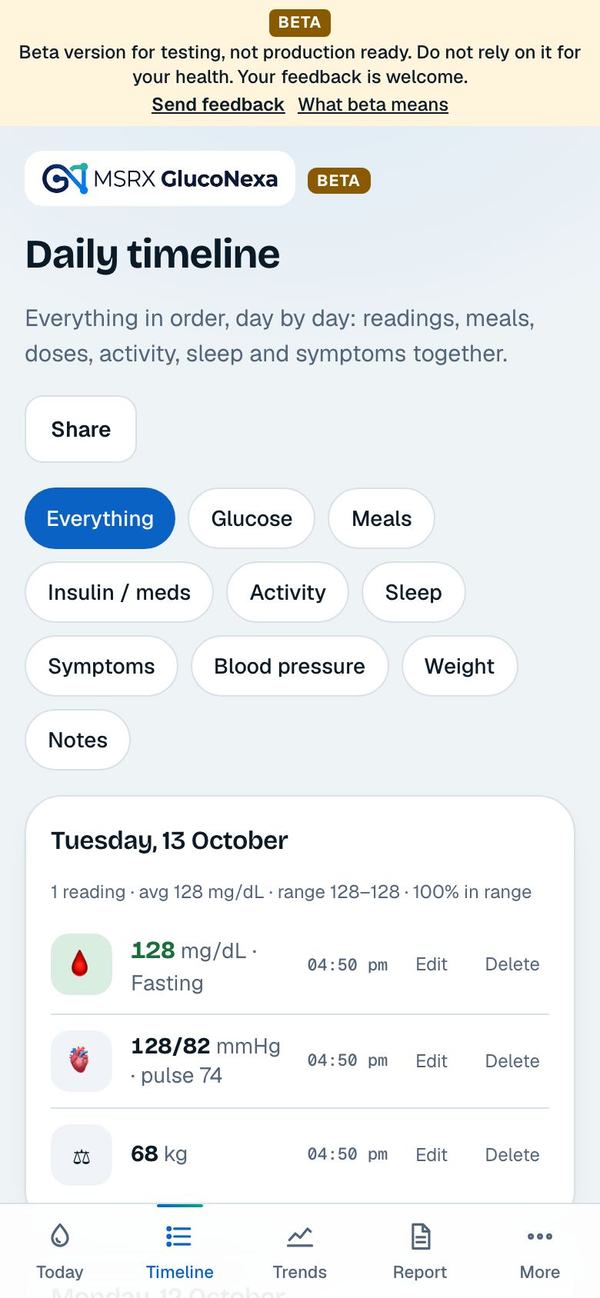
Open Timeline in the bottom bar. Each day shows its readings, average and share in range. Use the chips (Everything, Glucose, Meals, Insulin / meds, Activity, Sleep, Symptoms, Blood pressure, Weight, Notes) to show one kind of entry.
The Share button at the top shares a short summary of the period.
Correct an entry
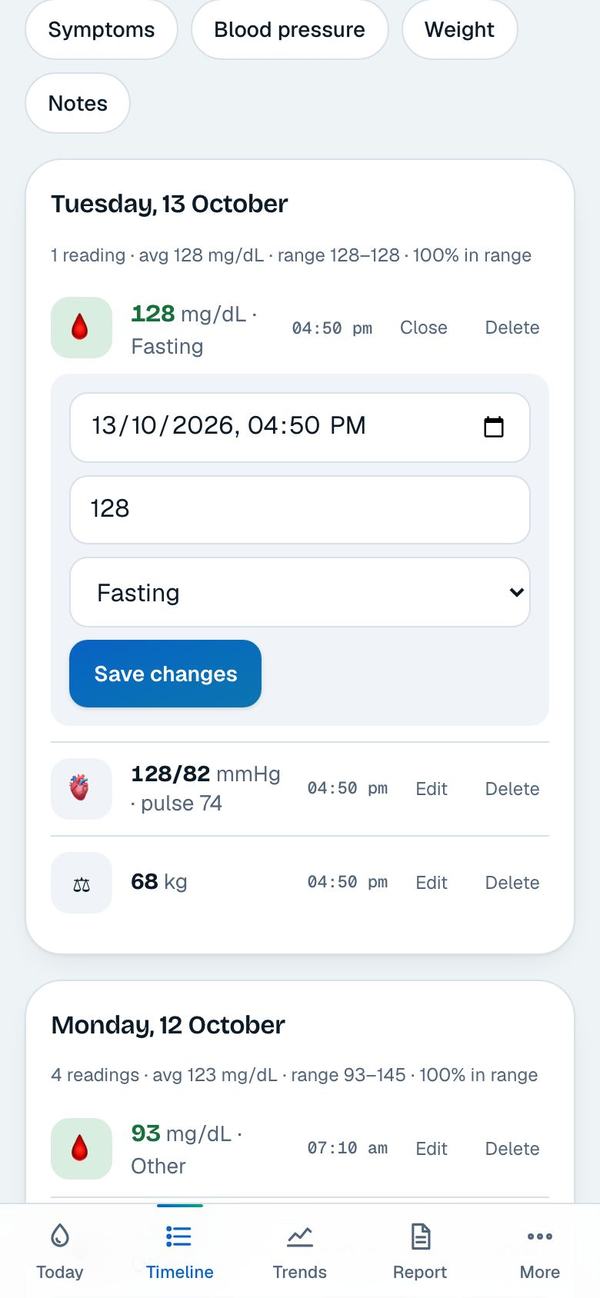
Tap Edit beside an entry to change its time, value or the “When” label, then tap “Save changes”. A mistake in the number is fixed in a few seconds.
Tap Delete to remove an entry. The app asks you to confirm first, and a deleted entry cannot be brought back.
5. Understand your numbers
These screens turn your log into something you can read at a glance. They describe your own readings; they do not diagnose.
The overview on Today
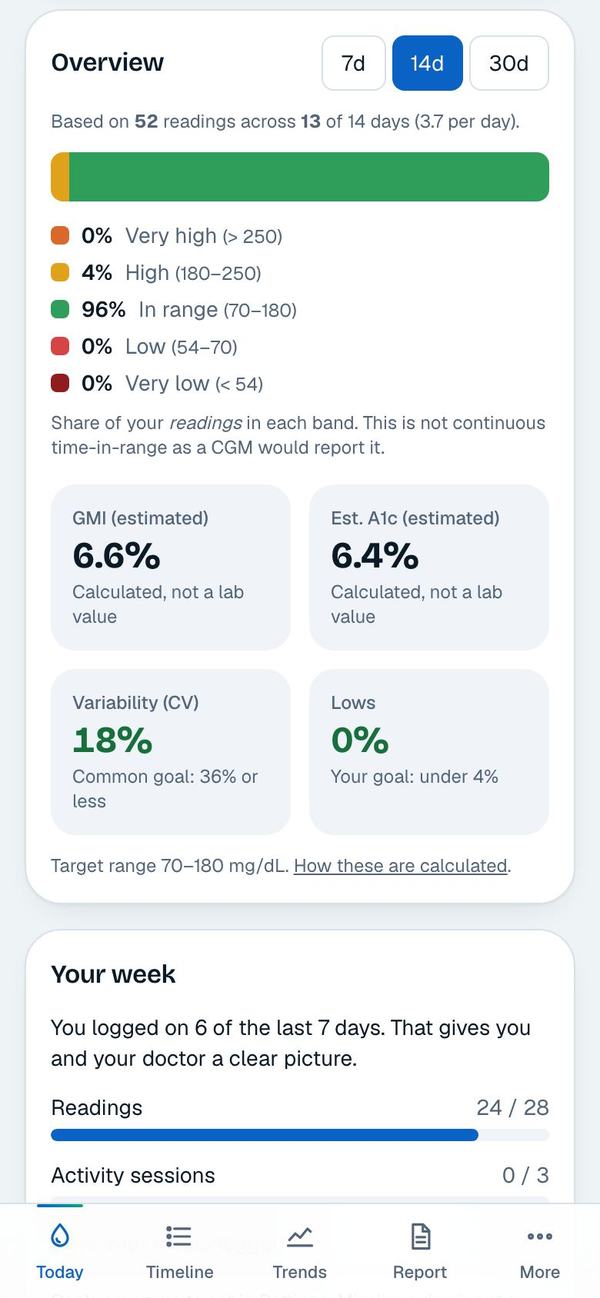
Below Quick log, the Overview card shows how your readings split across ranges for 7, 14 or 30 days, plus estimated A1c, variability and lows against your goal.
Estimates are calculated from your readings, not lab values. Tap “How these are calculated” to see the exact method.
Trends
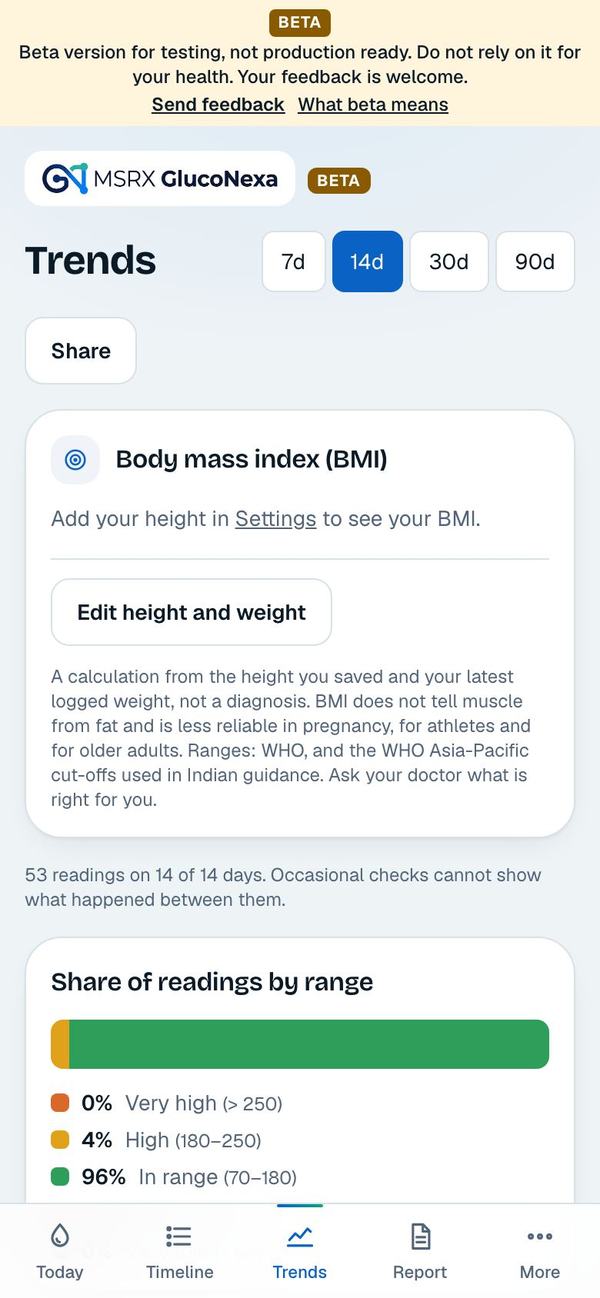
Open Trends and choose 7, 14, 30 or 90 days. You see the range split, average, estimated A1c, variability, lowest and highest.
Add your height in Settings to see your BMI here.
Charts
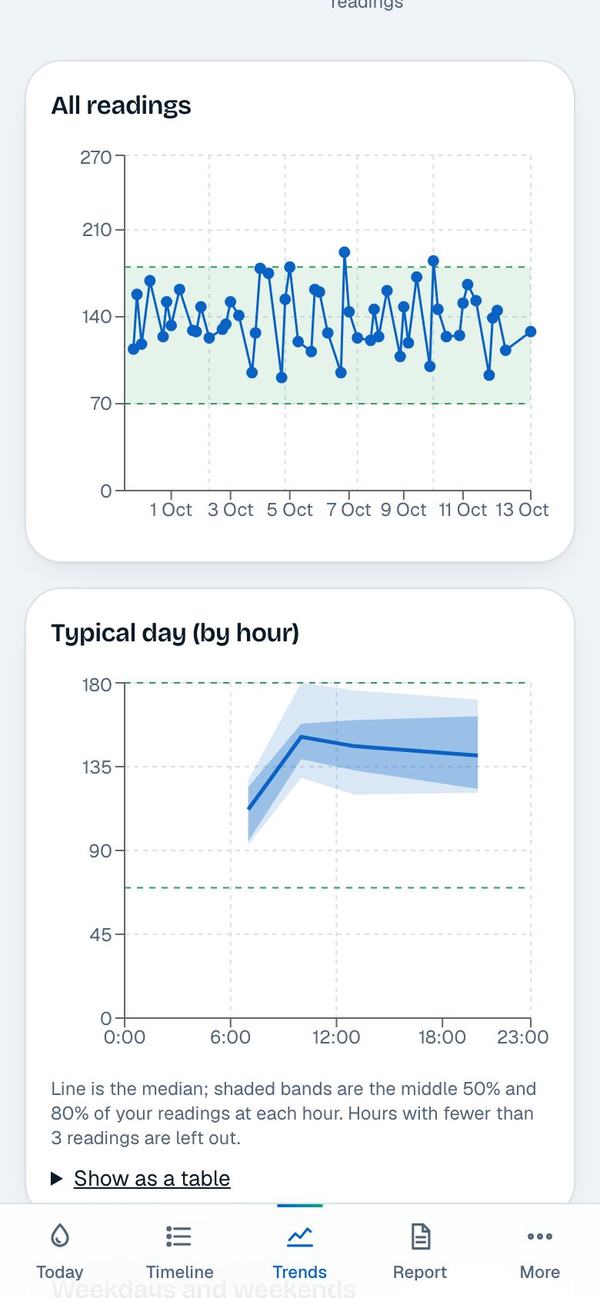
Scroll down for the chart of all your readings against your target range, and the Typical day chart that shows which hours run high or low. Tap “Show as a table” under a chart to read the numbers instead.
Summaries
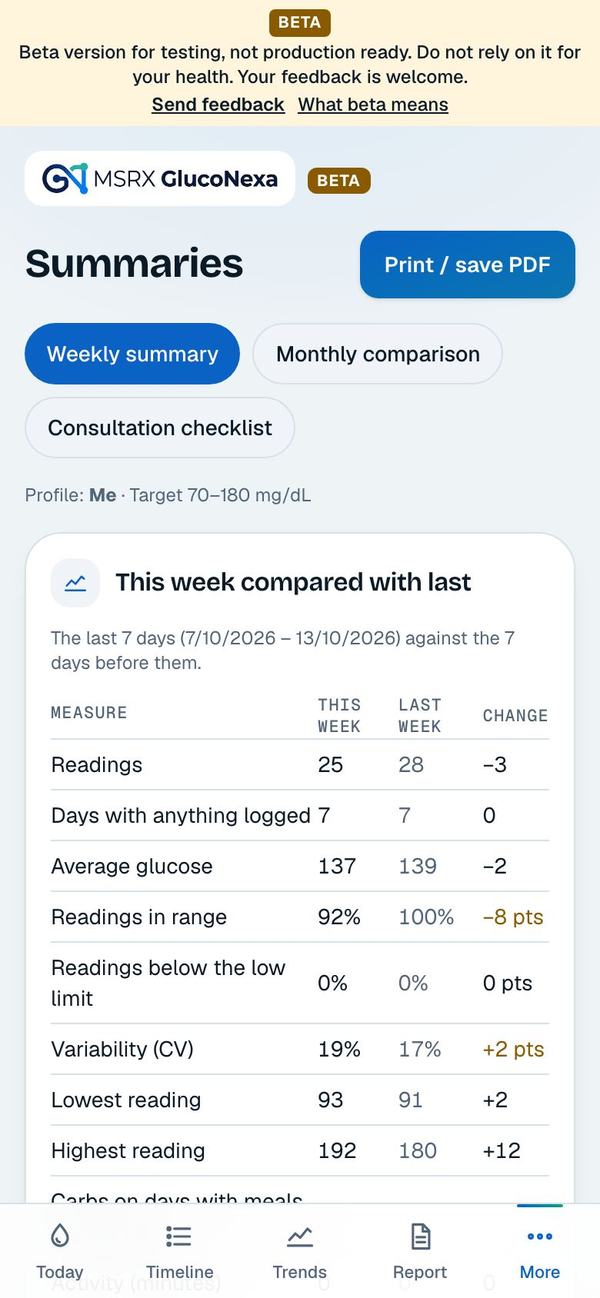
From More, open Summaries. Weekly summary compares this week with last. Monthly comparison does the same for months. Consultation checklist helps you prepare for a doctor visit.
Tap “Print / save PDF” to keep a copy.
6. Take a report to your doctor, and share
You choose what leaves your phone, with whom and for how long.
Make a doctor report
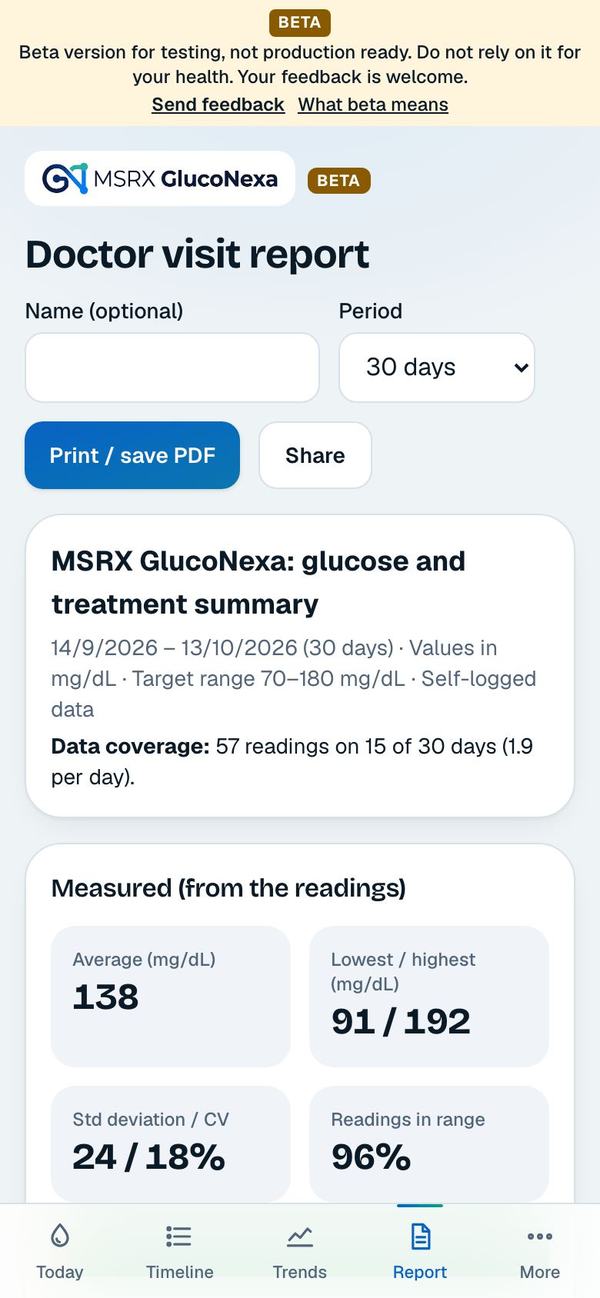
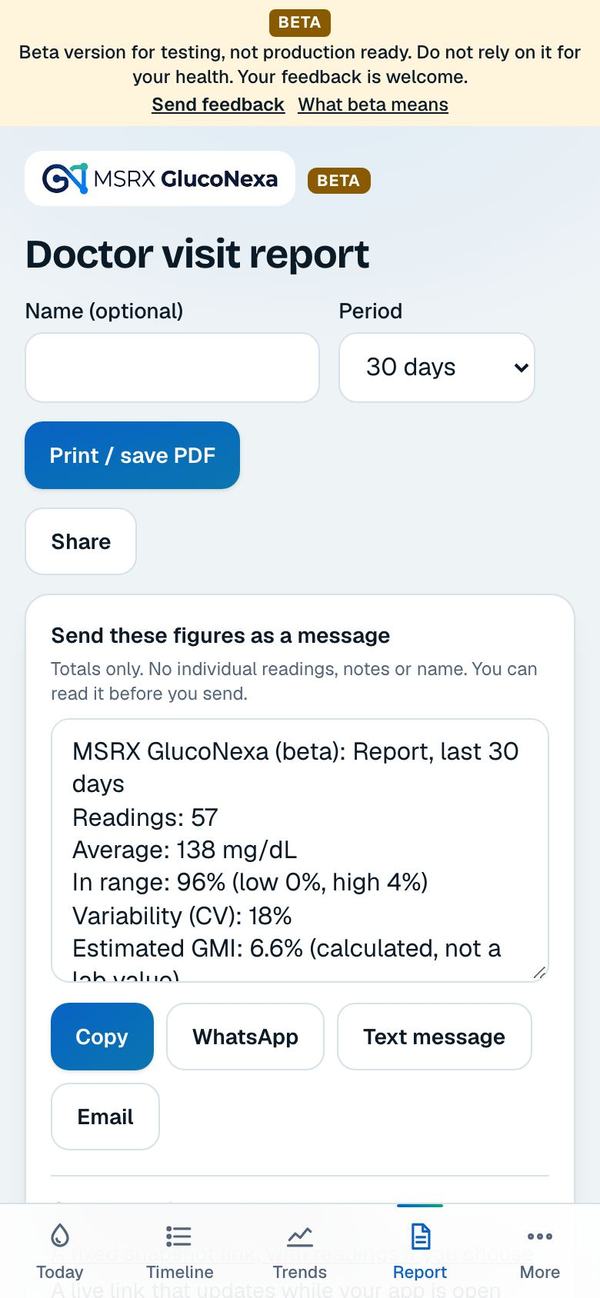
Open Report in the bottom bar. Add your name if you want it on the page, choose 14, 30, 60 or 90 days, and tap “Print / save PDF”. On a phone, choose Save as PDF in the print screen.
The report lists the numbers, a typical day, medicines logged and patterns noticed. Patterns are observations, not diagnoses.
Send the figures as a message
Tap Share on Report, Timeline or Trends. You get a short text with totals only: no individual readings, notes or name. Read it, edit it if you like, then Copy it or send it by WhatsApp, text message or email.
Share live with family or a doctor
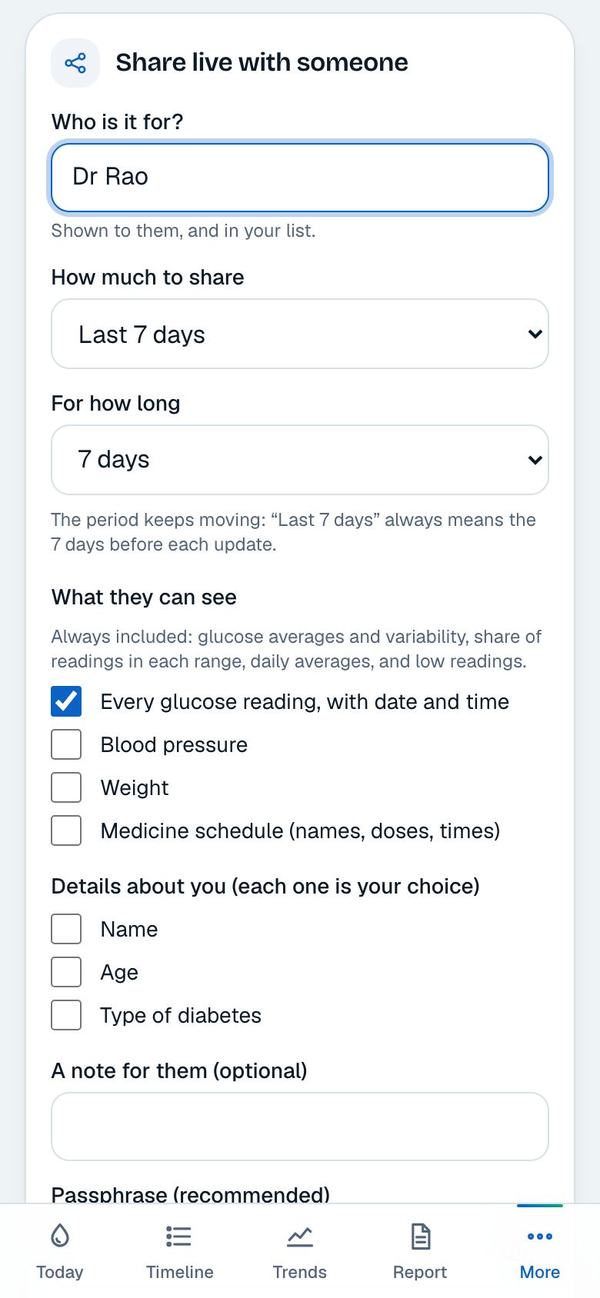
From More, open Live sharing. Type who it is for, choose how much to share and for how long, and tap “Create live link”. Send the link to that person only.
Updates go straight from your phone to theirs, encrypted, while your app is open. Nothing is stored on a server.
Choose exactly what they see
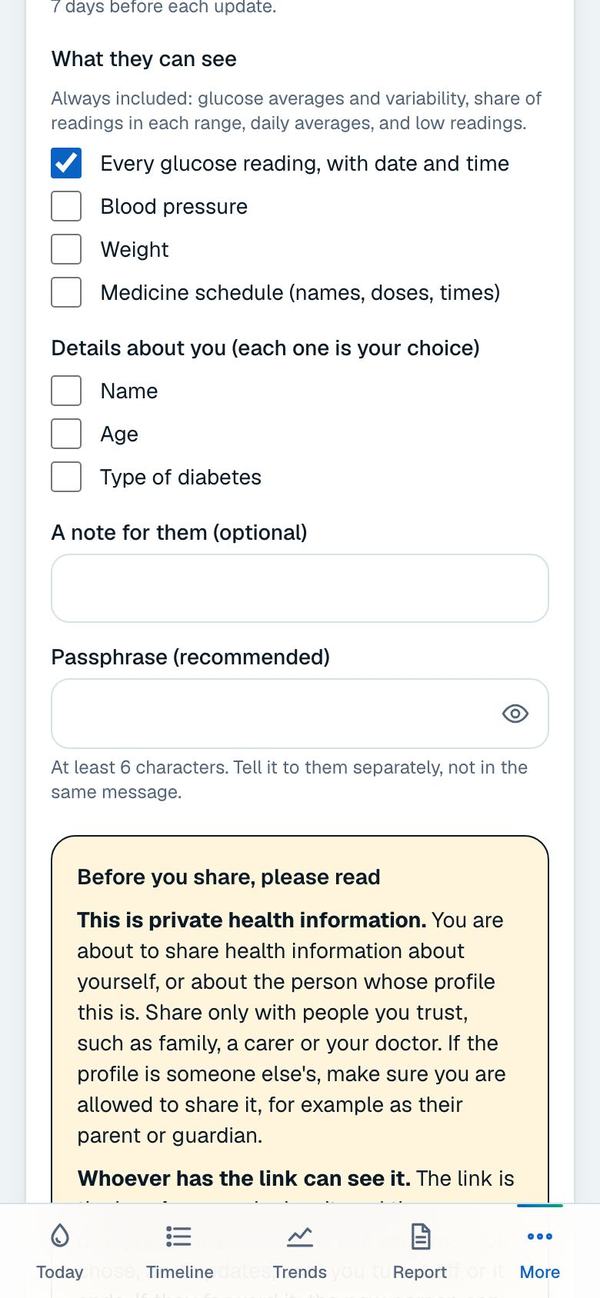
Tick what the link includes: glucose readings, blood pressure, weight, medicine schedule. Name, age and type of diabetes are each your choice. Add a passphrase and tell it to them separately.
Make one link per person. You can turn any link off from the list on the same screen, and a bar on every screen shows while sharing is on.
Or send a fixed copy
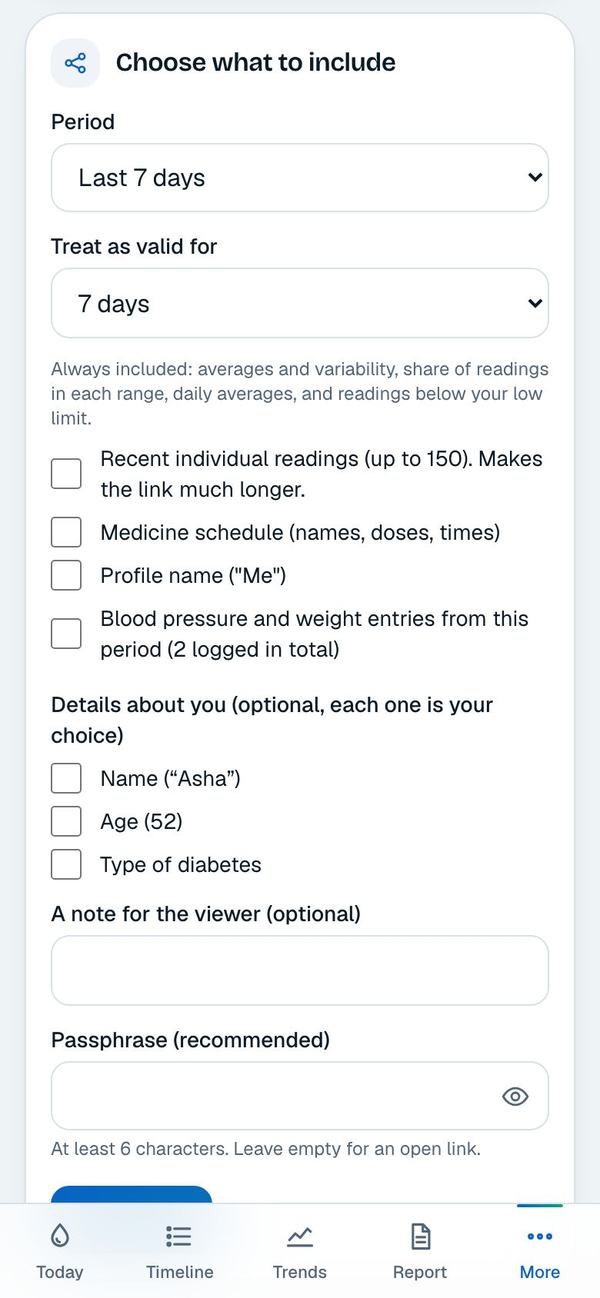
From More, open Share a snapshot. Choose the period and how long the link is valid, tick any extras and tap “Create link”. The copy sits inside the link and cannot be taken back once sent.
Use a passphrase when you can. Without one, anyone who gets the link can read it.
Good to know: The person opening a link can pick their own language at the top of the page.
7. Medicines, lab results, events and search
Open More in the bottom bar to reach these.
The More menu
More groups everything else: your log (Medicines, Labs, Events, Search), bringing data in and sending it out (Import, Sync, Live sharing, Snapshot, Summaries), and making it yours (Settings, Privacy centre, App lock, User agreement, How it works).
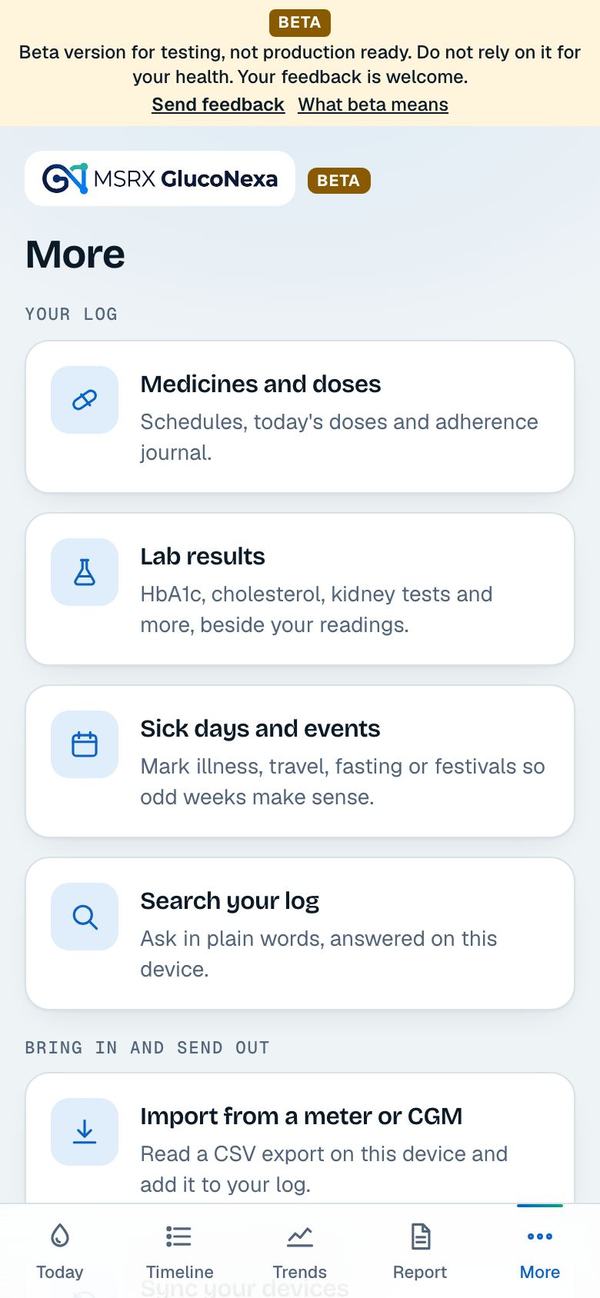
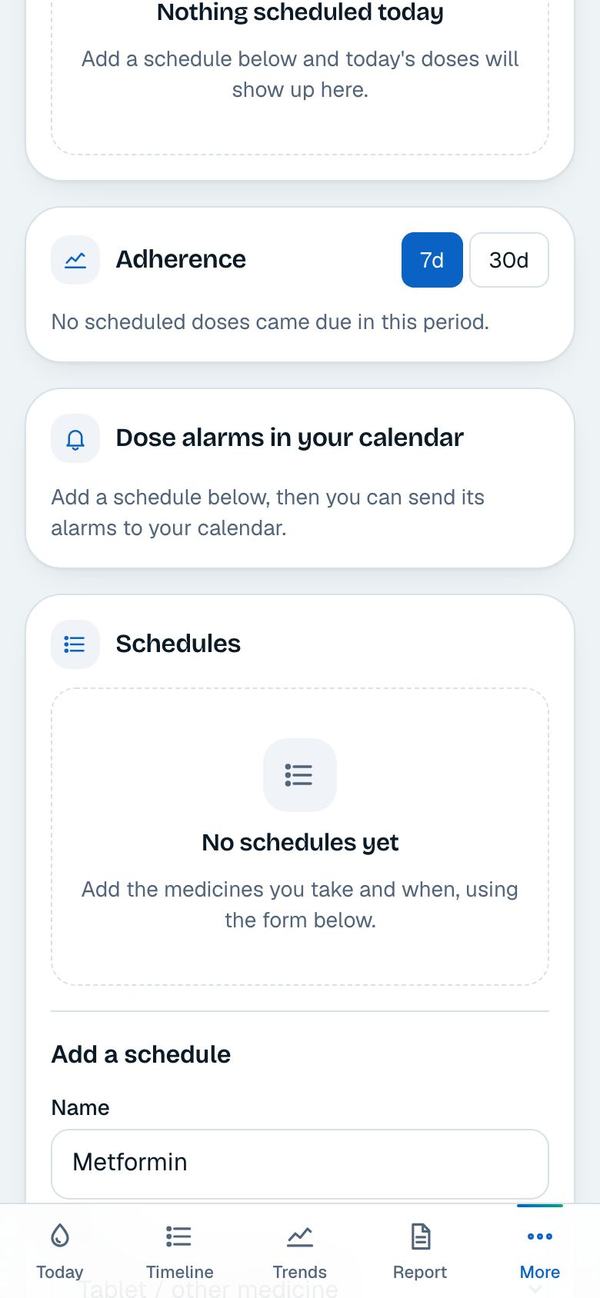
Add a medicine schedule
Open Medicines and doses. Under “Add a schedule” enter the name, choose the type, enter the dose your care team prescribed, add the times (“+ Another time” for more) and pick the days. Tap “Add schedule”.
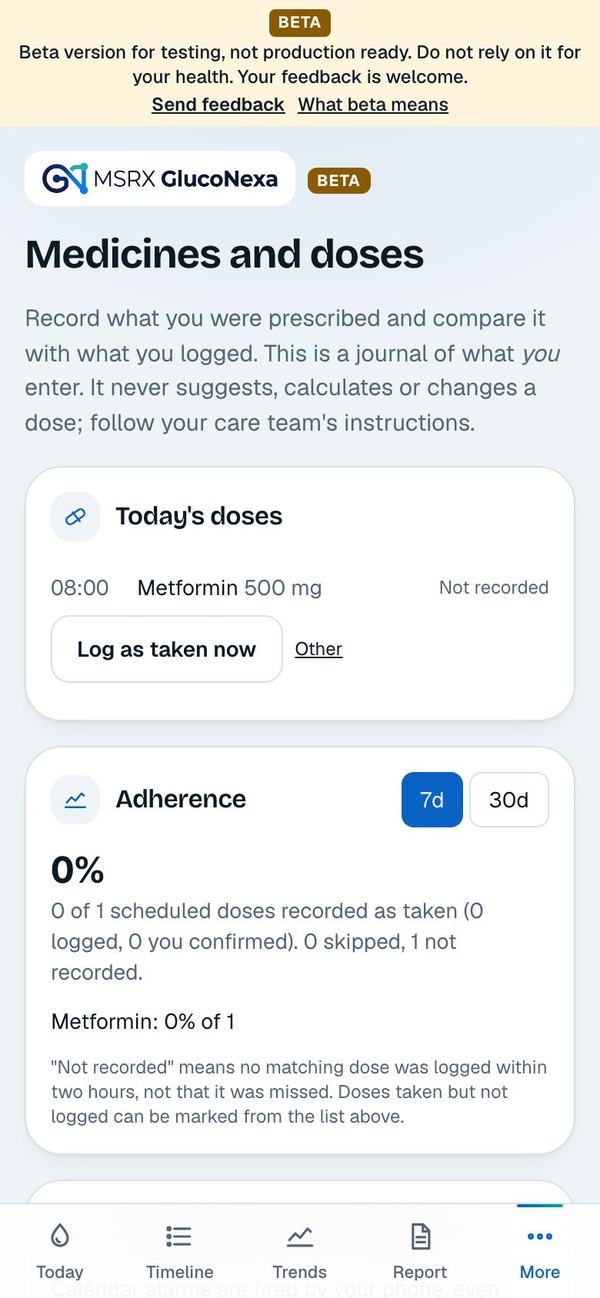
Mark doses as taken
Today's doses appear at the top. Tap “Log as taken now”, or “Other” to choose a different time. Adherence shows how many doses you recorded. You can also send dose alarms to your phone's calendar.
Reminders in the app only work while it is open. For doses you must not miss, also set an alarm in your phone's clock.
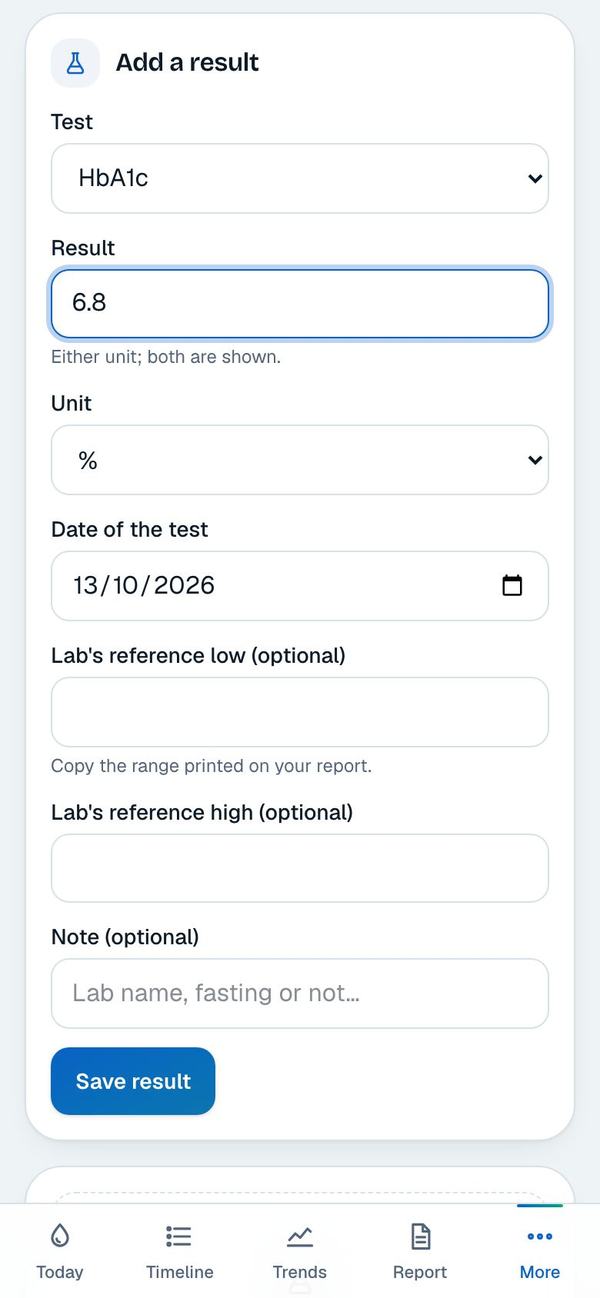
Keep lab results
Open Lab results, choose the test (HbA1c, cholesterol, kidney tests and more), type the number from your report and the date, and tap “Save result”. The app records the numbers and does not interpret them.
Mark sick days and special events
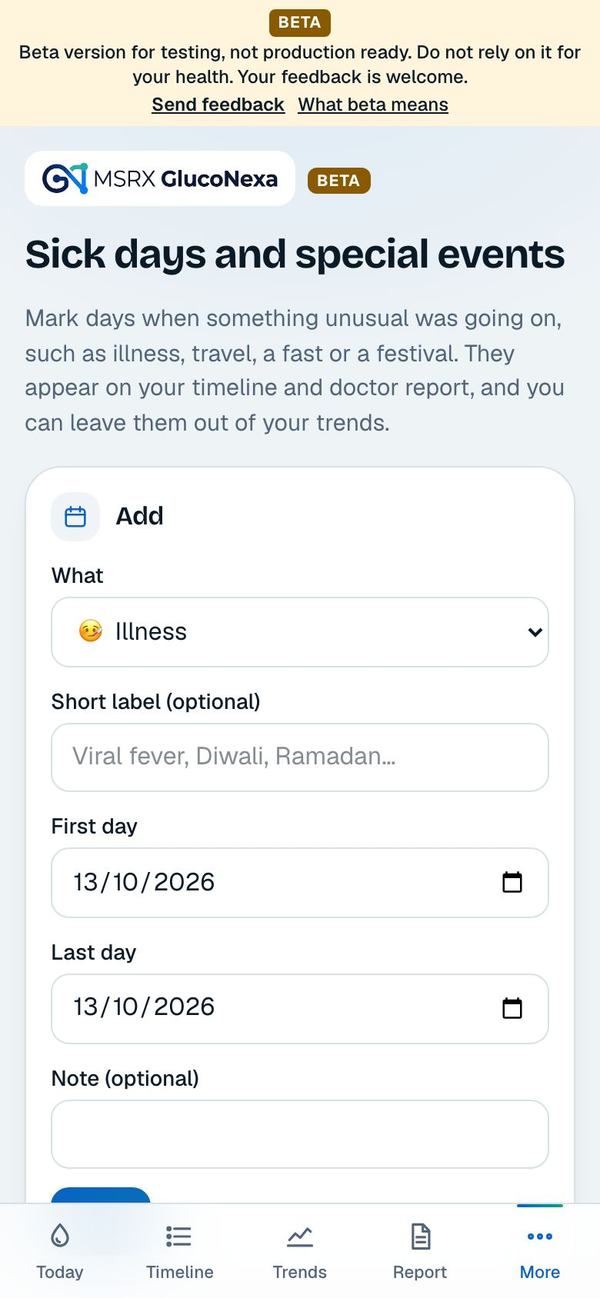
Open Sick days and events. Choose illness, travel, fasting, festival, stress or other, set the first and last day and tap Save. They show on your timeline and report, and you can leave them out of your trends.
Ask your log a question
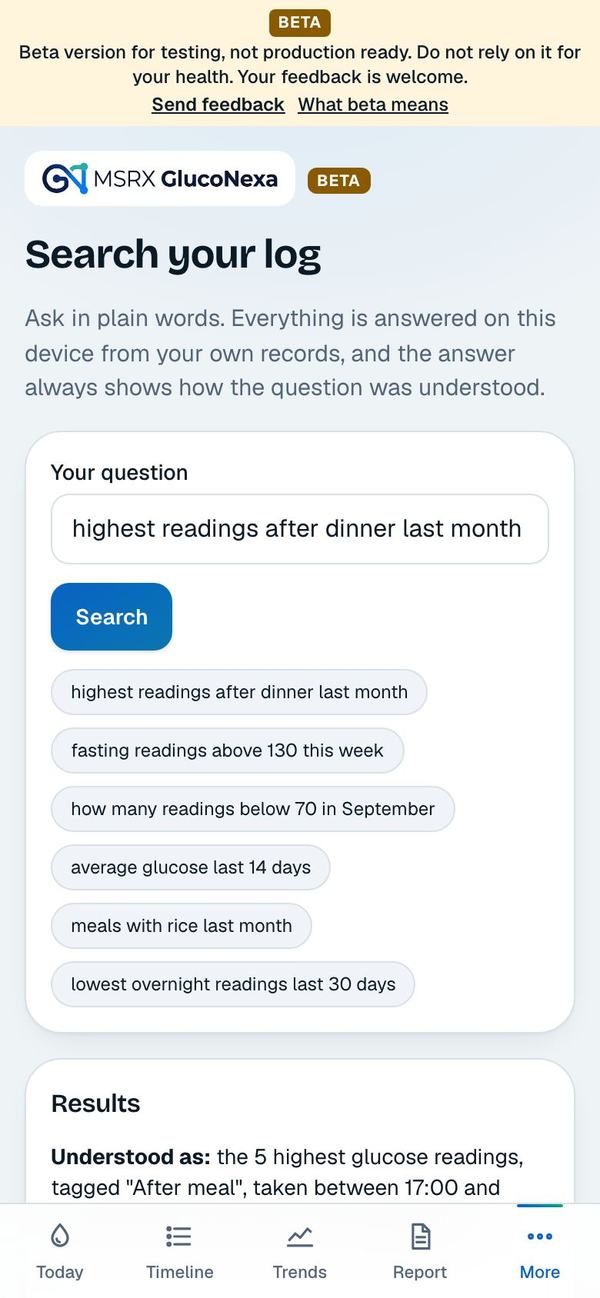
Open Search your log and write a question in plain words, such as “highest readings after dinner last month”. The answer is worked out on your phone and always shows how the question was understood.
8. Bring in a meter or sensor file
If your meter or sensor app can export a CSV file, you can add its readings in one go.
Choose the file and check the columns
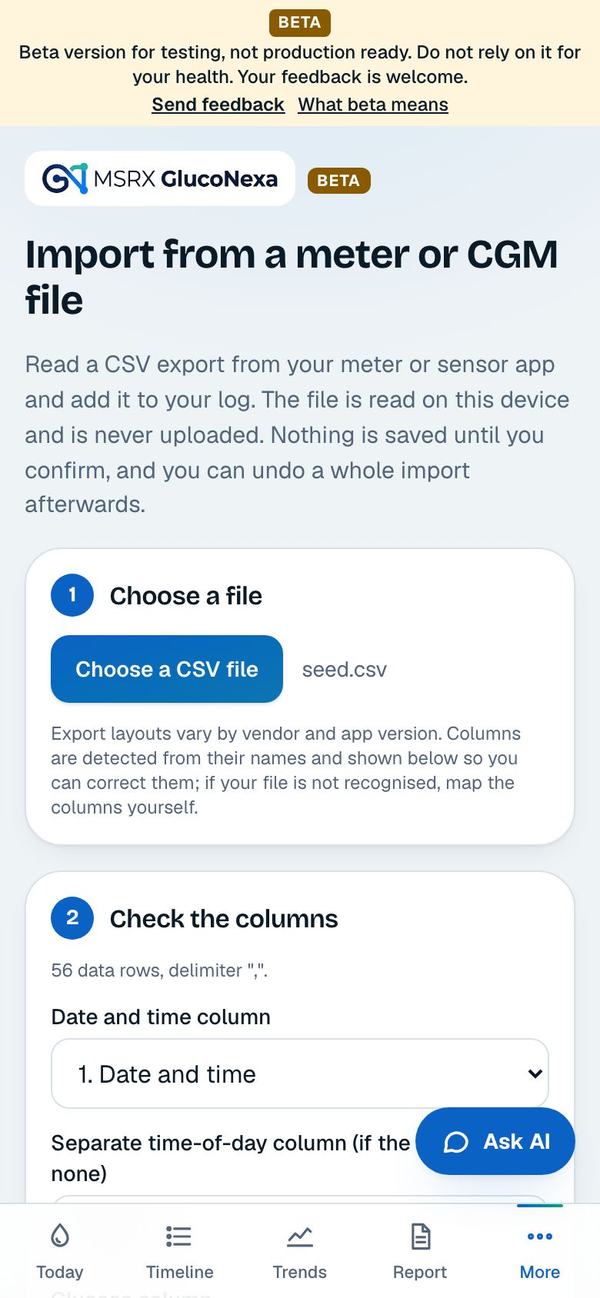
From More, open Import. Tap “Choose a CSV file”. The file is read on your phone and never uploaded. The app guesses which column is the date and which is the glucose; correct them if needed.
Preview, add and undo
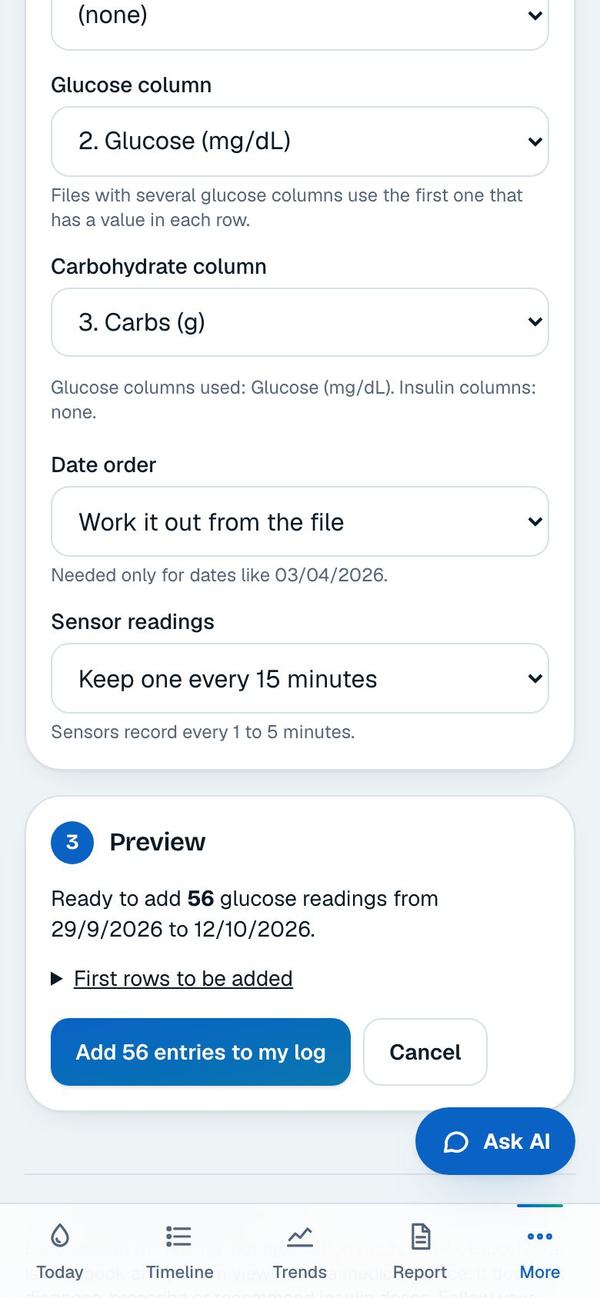
The preview tells you how many readings will be added and from which dates. Duplicates are skipped. Tap “Add … entries to my log”.
Changed your mind? Each import can be undone as a whole, further down the same page.
9. Keep your log safe
Your log lives only on this phone. If the phone is lost or the browser data is cleared, it is gone, so make a backup.
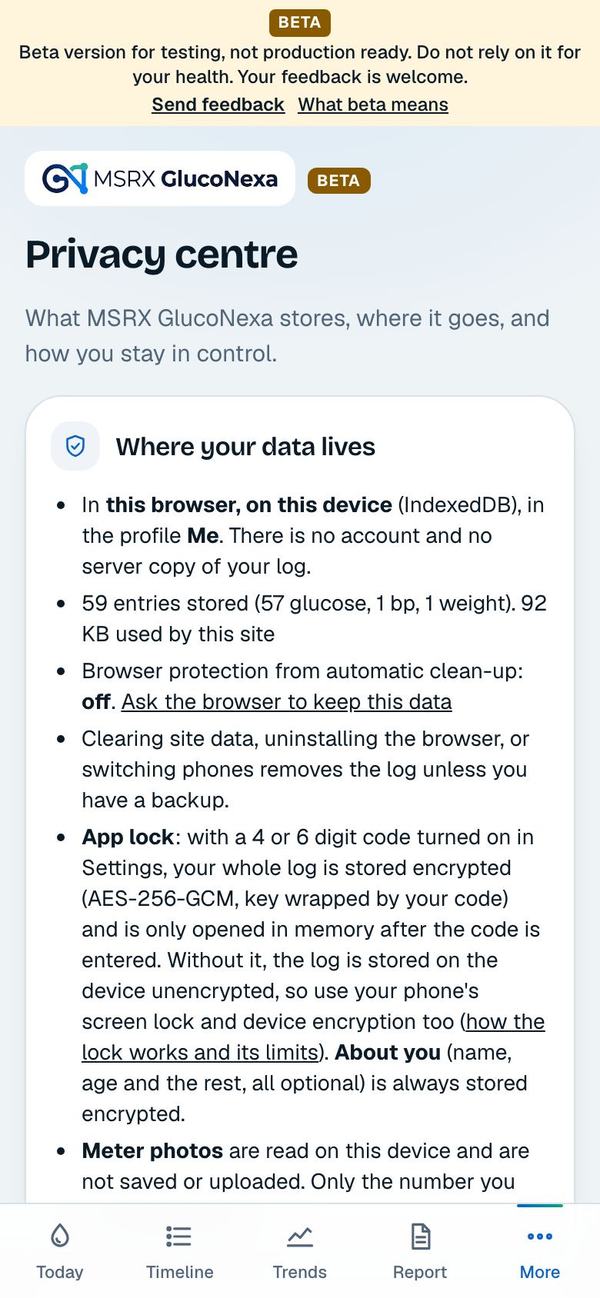
See where your data is
Open More, then Privacy centre. It tells you what is stored, where, and what leaves the device. It also holds your backup and delete options.
Make a backup
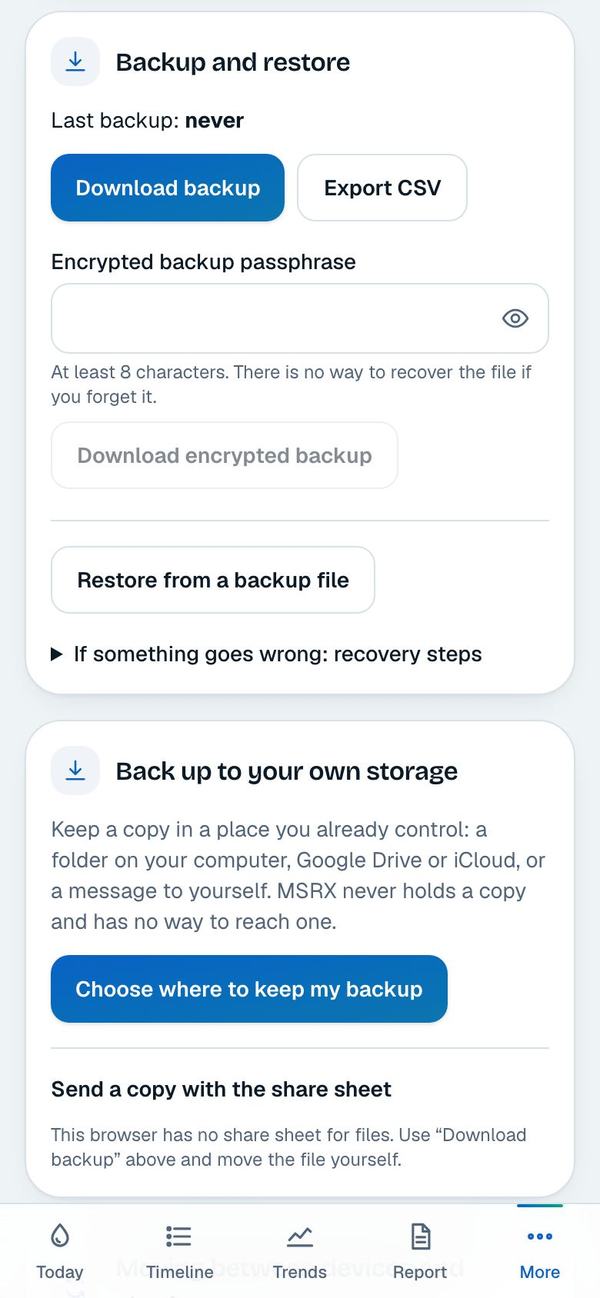
Under Backup and restore, tap “Download backup”. For a file that only you can open, type a passphrase of at least 8 characters and tap “Download encrypted backup”. Keep the file somewhere other than this phone.
To restore on a new phone, open the Privacy centre there and choose “Restore from a backup file”.
Good to know: There is no way to recover a lost backup passphrase. Write it down.
Turn on the app lock
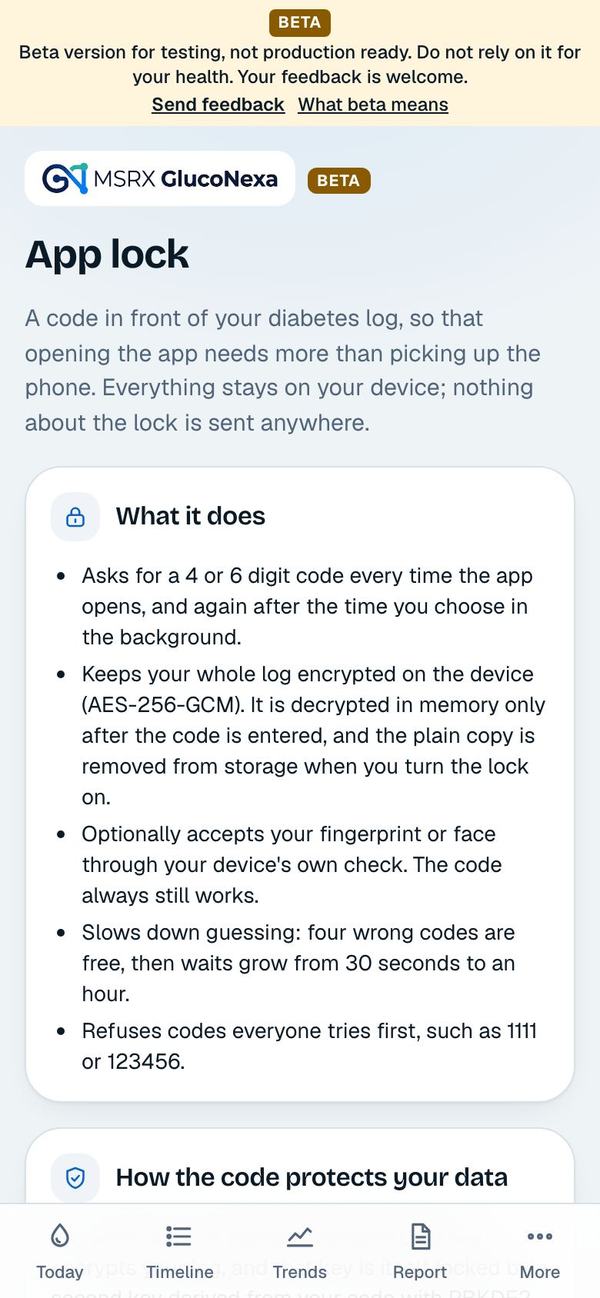
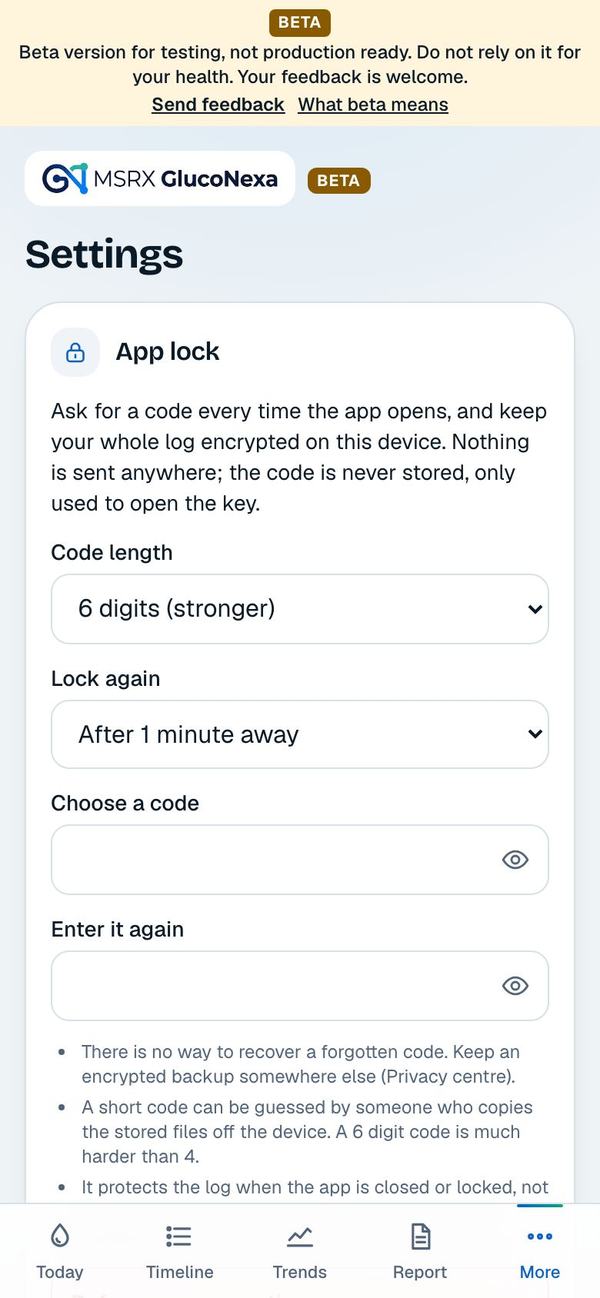
Open Settings, then App lock. Choose a 4 or 6 digit code, choose when it should lock again, type the code twice and tap “Turn on app lock”.
The app refuses easy codes such as 1111 or 123456, slows down after wrong guesses and never stores the code itself.
10. Make it yours
Open More, then Settings.
Units, targets and goals
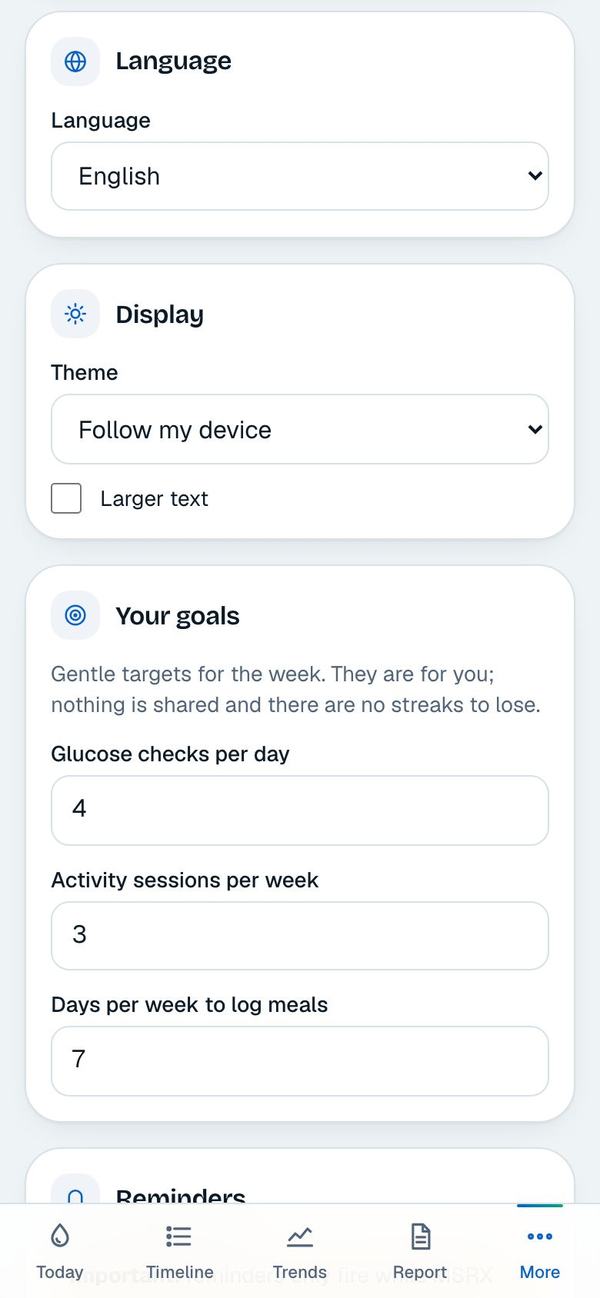
Under Units, choose mg/dL or mmol/L. Under Glucose targets, pick a starting point (standard adult, older adult or higher risk of lows, pregnancy with type 1 diabetes, or your own numbers) and set the limits with your care team. The colours and alerts everywhere follow them.
Under Your goals, set gentle weekly targets for checks, activity and meal logging. There are no streaks to lose.
Language and display
Under Language, choose one of 11 Indian languages or English. The translations are drafts. Under Display, choose a light or dark theme or follow your phone, and tick Larger text for easier reading.
Some newer messages are still in English only while translations catch up.
11. Get help
Two places answer questions, and neither needs you to sign in.
Ask GlucoNexa, the AI helper
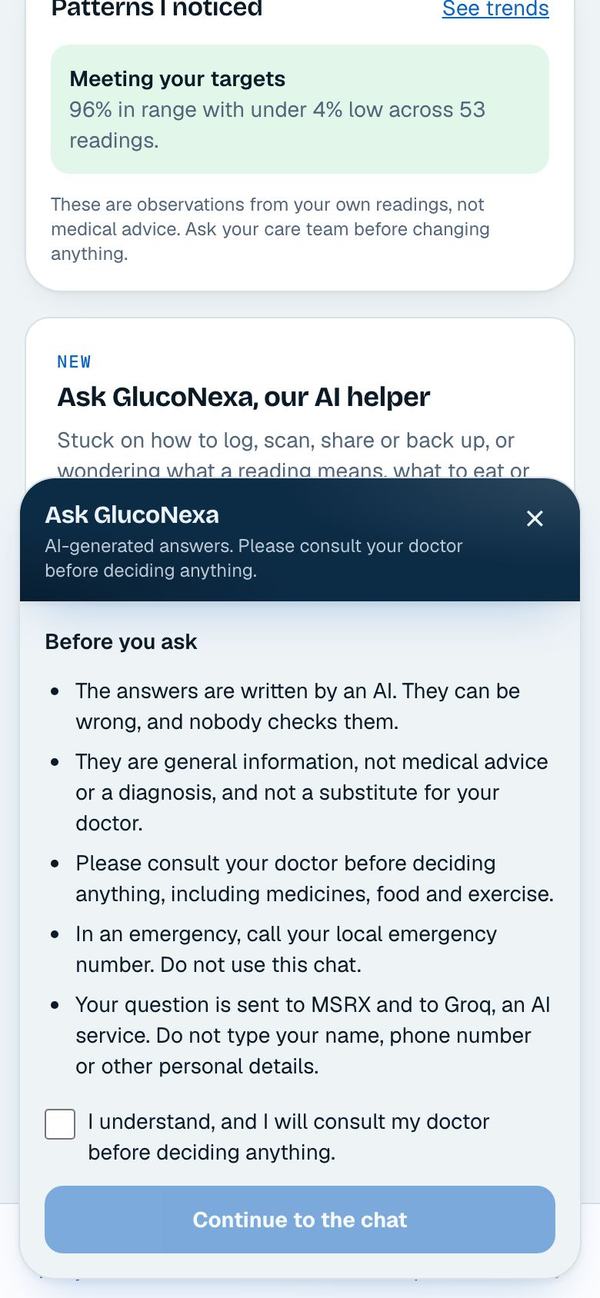
Tap the blue Ask AI button on any screen. The first time, read the notice and tick the box. Type a question or tap one of the suggestions. You can also tick the box to let it look at your recent log when you ask about your own readings.
Its answers are AI-generated, can be wrong and are general information. It does not give diagnoses or doses. For an emergency, call your local emergency number: do not use the chat.
The help page and feedback
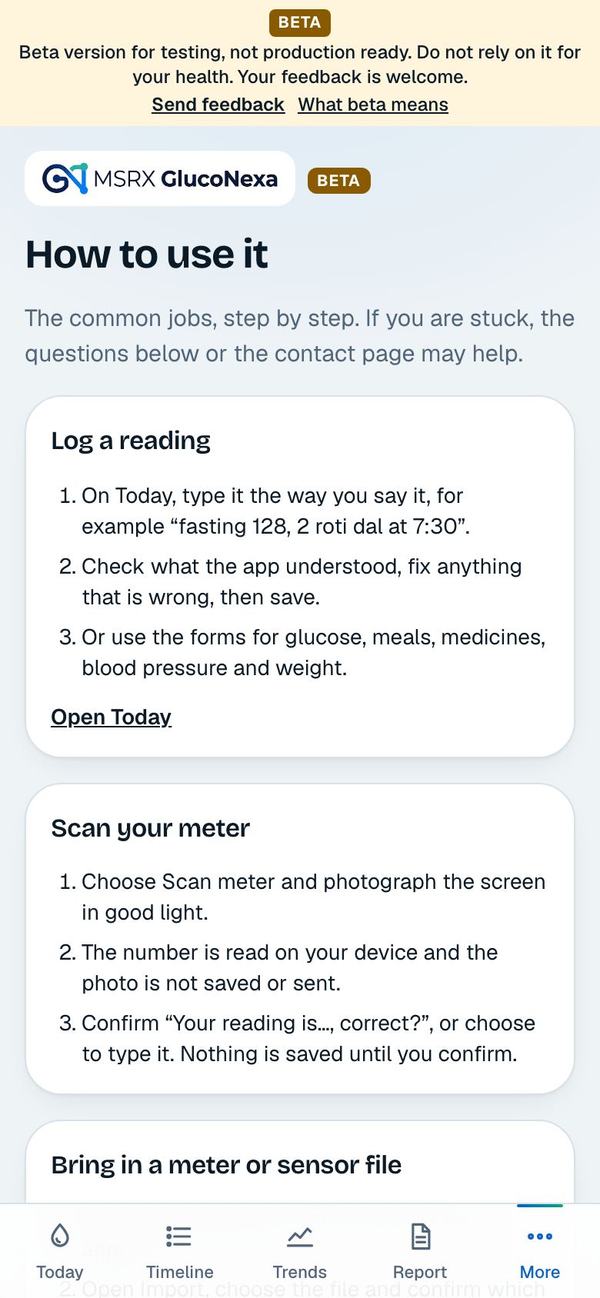
How to use it (the Help page) has short instructions and common questions. The footer of every page links to the privacy notice, user agreement and contact page.
This is a beta version. If something is wrong or confusing, please send feedback with the link at the top of every page.
Screenshots show the beta version and may differ slightly from what you see after updates. Questions? See Questions and answers.